
 Hi! This is Katie, the wife Kelson’s mentioned a few times. I’m not nearly as involved with comics as he is, but I appreciate a good convention costume and have made a point of wearing at least one a year for a while now. My interests in effects makeup, jewelrymaking, and general arts and crafts really come in handy for this, though it had been a long time since I’d been able to persuade Kelson to dress up for a con. When he mentioned that he’d wear a Jay Garrick Flash costume if he could get all the pieces, my ears pricked up. When he said something about how a really determined person would make a paper-mache hat, I said, “I could do that.” In the end, I did quite a bit more.
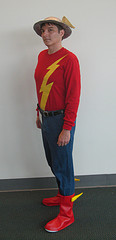
The helmet is made from paper mache, Crayola Model Magic, glue, felt, cardboard, a few gap-filling pastes of varying efficacy, and both brush-on and spray-on paint and clear-coat spray acrylic. The boots are vinyl covers glued (again, with a sort of tiered success) to a pair of $20 Payless slip-on shoes, with stuffed plush wings made from felt and sewn on. And the shirt, which we originally thought would be taken care of by Graphitti Designs, involved some last-minute Amazon ordering, masking tape, and several applications of fabric paint. I was heat-setting the thing at midnight the Tuesday before the con; we have yet to see what washing will do to it.
The Helmet
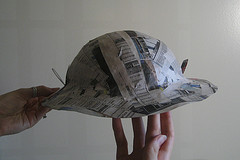
I started with the helmet, figuring it would take a while to dry at the thicknesses I’d be creating, even in dry heat. (One thing California summer weather is good for!) We bought the traditional balloons, but I wanted an armature that wouldn’t shrink. And anyway, balloons aren’t really good for creating a shallow oval bowl shape. I ended up using half of one of those kids’ playballs that stores keep in big wire cages. I stabbed the thing at the seam with my knife, then used plain scissors to cut along the handy dividing line and stuffed one half using our stock of #4 recyclable bags. It was a firm armature, easily shaped into the appropriate oval with a few strips of packing tape, and with enough give to pull away from the first layer of mache. The resulting shell looked odd when worn, partly because it was a little too deep with ragged edges, but it fit.
Shaping the brim started out easy. I decided what would be the front and back of the shell, had Kelson settle it on his head, and drew a pencil line around the outside at the level where the brim should start. Then I took scissors and snipped through the mache up to the line, at about 1/2 inch intervals all around. The tabs were folded outward to make a proto-brim that would provide support for more layers of mache. Just bending the tabs made it look immensely better and more hatlike. One side needed a lot of adjusting to make it sit level on both a tabletop and Kelson’s head. And then I realized that I’d unstuffed the original playball to peel it off the shell…and that I needed to make a brim armature as well. Ugh.
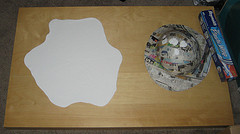
I started by trying to cut out strips of thin cardboard (cereal boxes) in curved strips to fit along the outside of the shell, but quickly realized this wouldn’t provide the slight downward tilt I wanted. In the end, I destroyed an empty Kleenex box, packing-taped the pieces into a flattish ring, and set that atop another strip of cardboard taped into a veeery short cylinder that just fit inside the bottom edge of the shell. After adjusting the tape and extending some of the pieces of the outer ring, I taped the whole assembly to the bottom of a plastic serving tray (which was probably very surprised, as it usually gets used for cookies and such). The playball wouldn’t fit into the center cavity, so I approximated with some of the stuffing materials and some tape. Satisfied with the pitch of the armature, I covered the whole thing with plastic wrap and started building up the mache.
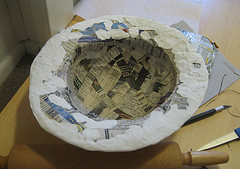
For those who are curious, I used a cornstarch paste with a little cinnamon and a lot of salt. The seasonings did their job: the resulting helmet neither smelled funny nor mildewed. Of course, the latter is probably because I applied only a few layers of paper at a time. The downside of this, in combination with not using a firm close-fitting armature after the first stage, was that the dome of the helmet developed dents. I popped them out as best I could, and filled in some of them with extra bits of paper, but I still ended up having to work around them in the end. Lesson learned.
 After the first brim application, I trimmed the edge wth scissors to a more even width, fine-tuning the shape through intermittent fittings. Once I had that down, I pencil-marked placement for two cardboard tabs that would eventually support the wings. These were actually made from an ad flier, glued down with Tacky Glue, with the upstanding bits “stuffed” with scraps of Kleenex box so they wouldn’t buckle when the wings were eventually put on. I applied my next layers of mache over the glued-down ends, then turned the (now-sturdier) helmet upside down and applied a layer over the other side of the brim to sandwich in the tabs coming off the dome. Two more applications of mache over the top, a final shaping trim, and I was ready to start the next phase.
 I’d known from the start that I’d be wrapping the entire helmet in rolled-out sheets of Model Magic. It’s smoother than mache, and provides a lot of bulk for a little weight–important in a hat. What I didn’t know was that I’d need two packages of it, or that we’d be using some of the first pack to ant-proof our refrigerator seals. I knew from experience that MM will sometimes crack if wrapped around porous material, so I was smart enough to do a test wrap of a small disc of mache. The flat side where I’d pinched the edges of the MM together cracked, but the edges of the disc and the side that was just rolled didn’t. So I decided to treat it like pie crust: don’t stretch it, and moisten the seams. I filled in the remaining dents in the dome, then rolled out the rest of the package. It was just about the perfect amount to cover the top and anchor around the brim, and moistening the seams (unwanted, but inevitable) actually did seem to make a difference in the smoothness of the surface.
 Problem #1 surfaced before the wrap was even dry. Part of the cracking on the test disc was due to the fact that MM apparently shrinks as it dries. The sheet-wrapping was pulling up off the mache, which, while it made for a nice even slope, meant the layer of MM was unsupported in parts–making for easy punch-throughs and cracking if handled wrong. So I bit the bullet, got out my X-acto, and made some careful cuts at the edges of the worst-affected areas, then freed the sheet from where it was anchored to the brim. I got some Tacky Glue in under the flaps where the dome became brim, and hand-clamped it until it didn’t want to pop free. Then I had the unpleasant task of shaving little bits of MM off the edges of the flaps so they’d fit flush together. The result wasn’t awful, but it wasn’t perfect, either. Remembering a glue-and-talc dough I’d once made into flexible sculptures, and having no talc on hand, I mixed some white glue with cornstarch and spread the paste over the seams. It worked pretty well as a gap-filler, adhering to the MM with minimal cracking. Once I was sure of this, I patched little cracks and nicks all over the top surface.
 It puzzled me that the MM had adhered to the brim but not the rest of the mache, until I remembered I’d been sealing the seams in the pliable MM with wet hands. When I got the second package of MM, I used the knowledge: when wrapping the under-brim, I applied smaller chunks and rubbed water over the back of them until tacky. I’d already filled in some of the uneven spots and used the X-acto to shave down bulgy areas of the top wrap. The only real issue with the underbrim was melding the edge of it with the upper brim. I did my wet-handed best, but there were still ridges and hollows that dried too fast for me to smooth out. Ah well, I’d gap-fill it afterward. Famous last words.
Problem #2 was a direct result of my attempt to fix something that wasn’t broken. Rather than using the simple gap filler I’d devised before, I made up a different recipe using some of my mache paste with extra cornstarch, flour, and glue in. It went on more smoothly and with fewer raised edges, and I thought I’d made a good decision. But when I sprayed on the primer coat (masking the inner dome with a wad of newspaper), I saw the error of my ways: a sea of tiny cracks, all over the spots where I’d used my New-Coke gap filler.
Even through the freakout, I noticed that the spots where I’d used only the original formula weren’t noticeably cracked. So, once the paint was dry, I made a new batch and made a token effort to scrape off the other stuff, which wouldn’t scrape. Eh, at least it didn’t seem likely to flake. I made sure to keep the new coat just thick enough to cover the cracks, so that it wouldn’t be tempted to crack too. When we primed that, it was quite acceptable. Crisis averted.
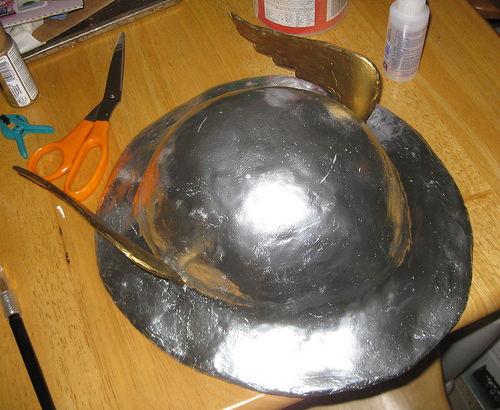
We’d gotten super-shiny metallic silver spray paint, and when we covered the wing-tabs and painted the helmet, it looked awesome. I swear, we were both grinning like idiots for ten minutes at the sheer coolness. Then we put on the wings.
Wait, I didn’t say how I made the wings? Okay, I can do that.
The Wings
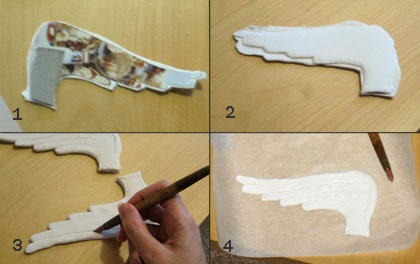
After looking at about ten designs for the helmet and the wings, I drew on cereal-box cardboard a prototype intended to hybridize them all. Somehow, it ended up being in exactly the right proportion to match the helmet *and* pleasing Kelson. So I cut it out, traced it over again, and made a scan of the two cutouts for archival purposes. (This is important, like the suspenders in the Just So Stories.) I used the cutouts as a pattern for the boot wings before making the helmet wings around them, so as not to have to duplicate too much effort. Then I cut down the edges by about a millimeter all around, so they wouldn’t “grow” too much when all the edges were encased in MM. I wrapped a strip of packing tape, sticky side out, tightly around each tab on the helmet, positioned one wing at a time, and sandwiched the taped tab between the wing and an unshaped strip of cardboard. This ensured a tight fit for the wings during the final adjustment phase, and more friction to help the glue hold them on in the final product, while still letting me remove them. I shaved down the edges of the unshaped strips with the X-acto to keep them from showing through the MM layer, then pressed the whole assembly into a rolled-out hunk of MM, cut carefully around it (not paying too much attention to detail at this point), picked it up, and put it cardboard-side-down onto another sheet of MM. I cut out the second layer, wet-smoothed the seams, and sculpted the feather tips, and then started pressing in the detail. The sculpting tool I used was made for polymer and terra-cotta clay, but the rubber tips–one a rounded point, one a straight line–worked just as well on MM. I kept the surface moist, which unexpectedly made the tool squeak as I drew. Unfortunately, one of the wings was a little too moist, and cracked along the pressed lines as it dried. So I had to print out the scan I’d made (see? I said it was important) and make a replacement wing. Amazingly, I had almost exactly enough MM left to do it. The leftovers made a ball only about the size of a cherry.
The wings needed minimal gap-filling, and were quickly ready for painting. I used a color called “Glorious Gold,” which was absolutely perfect, especially against the ultra-shiny helmet. Metallic acrylics have really improved from the stuff I was using to paint Sculpey 15 years ago. It took about 5 coats, but it dried fast. I waited until the wings were painted before fitting them, so I could cut off some of the painted surface on each piece for optimum glue effectiveness. I put some glue on the tabs, too, in case any of it made its way past the tape to where it could stick to cardboard. I used Tacky, because it grabs faster and we were in a hurry by that time.
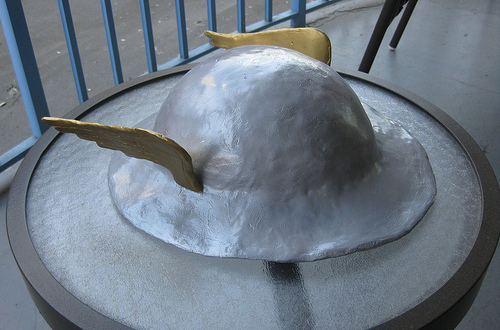
I’d wanted to glue the wings on before putting on the final coat of clear spray acrylic, so as to get a complete seal with no gaps. MM isn’t waterproof, and I want this thing protected as thoroughly as I can manage. Unfortunately, what with everything cracking and needing to be fixed, I hadn’t made time to test the full paint spectrum on the test disc. This meant that we didn’t know the acrylic, despite its label of “gloss,” would significantly dull the shine of the metallic paint. It was disappointing, but it was also about an hour before we had to leave the house, so there wasn’t much we could do about it. There was still plenty of shine left, just not as much as we’d hoped.
The final step, which I did at the hotel, was to line the inside of the dome with felt. This was easier said than done. All I really want to say about it is: thank heaven for curved nail scissors and Fabri-Tac, and for the little bit of give I’d built into the wing assemblies. And next time, I’m looking for a flimsy cloth hat to mutilate and glue in.
The result!
If this was interesting, come back in a few days for my post on the boots and the shirt. If it wasn’t…wow, you must be really bored to still be reading this.
Wow, that came out awesome!! Very nice job on the wings especially, I might have to try one of these, whether to wear or display, who knows? Cant wait for the boots and shirt post!!
The League of Heroes and/or the RPF forums would probably love to see this tutorial!
Well done — to say the least. The fact that you paper mached the helmet is INSANE! I never would have thought of going that direction.
Insanely cool.
.-= West’s latest blog post: SkyFire is a bad mutha… =-.
Awesome! Now I can just apply this to my Boodikka headpiece for next year…
Maybe it’s a cop out, but I went on eBay and got an old WW I ‘doughboy’ helmet for $10.00 and spray painted it chrome silver. For the wings, I used two brass number sevens from the hardware store, the kind you put on your front door for your house number. = )
I was thinking World War 1 helmet myself. 10.00 is a great price.
Definitely not a cop-out: a WWI helmet is probably the most authentic helmet you could use as a base. I remember a fan discussion at one point indicated that at least some artists use the Brodie helmet as a reference, and according to the current JSA run, it’s actually supposed to be Jay’s father’s WWI helmet!
I actually considered this myself, but I wasn’t sure where to look. I’d been casually checking costume stores for fake helmets since last Halloween, but never got around to looking for the real thing. By the time I started seriously thinking about the costume for Comic-Con, I figured it was too late to look. Then Katie volunteered to make one, and the rest is history!
One of the other Jay Garricks I ran into in San Diego also had used a WWI helmet. I don’t remember what he used for the wings originally, only that they’d broken the first day of the con and he had to make a quick substitute.
I also found a set of photos on Flickr of someone making a Flash helmet out of an unidentified army surplus helmet and wings from a toy pegasus.
Oh my goodness. I cannot let my husband see this, or he’ll want me to make him one!
.-= Fanboy Wife’s latest blog post: The Blackest Ring =-.
Fantastic job! As the G.A. Flash is my favorite superhero of all time, I tried my hand at making a costume a few years ago. Mine’s not bad, but yours is tremendous! Since I’m 50, I do come equipped with one major G.A. Flash(as he looks today) physical attribute…plenty of graying hair.
Marched in costume in our town’s Halloween parade in ’09. Actually heard a middle-schooler yell out, “Old Flash”!
Keep up the good work. I copped out on the helmet, and painted an old Marine Corps tropical pith helmet.