
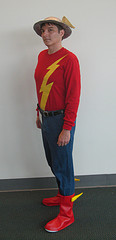
 Katie again, as promised, with details on the making of the boots and shirt for Kelson’s Comic-Con Golden Age Flash costume. This shouldn’t be nearly as long as the helmet post, I promise. My aim here is to show the entire process from design to display, as an aid to anyone else who might want to try something similar.
The Boots
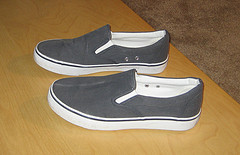
Our original intention with the boots was to get cheap boots and make boot covers. I’d picked up a pair of costume boots for myself at Payless at a huge discount a few years ago, which was surprising given that anything in a size 10 or over is hard to find in women’s shoes. However, men’s fashion boots are even harder to find, let alone with a price restriction, and in the sale room of DSW we reformulated our plan. We thought about permanently attaching semi-rigid covers to an old pair of sneakers, but realized that tying laces would prove impossible inside a boot. So it came down to slip-ons, and we located a pair at (surprise!) Payless that fit pretty well. The only question was whether to make them permanent or removable, and the material made the decision for us.
 I tend to be a cheapskate when it comes to crafts that I’m going to keep for myself. For gifts, sales, or commissions, I spare little expense; but for my own use it’s Red Heart Super Saver and Westrim beads, because I’m willing to undertake for myself the maintenance that will make the piece look like more than it is. We went to Jo-Ann with no idea what we wanted beyond “shiny bright red.” Luckily, this was during a huge fabric clearance and we found some less-than-half-price red vinyl, which settled the question of what to make the boots from. I also picked up some E-6000 cement, which claimed it would bond vinyl, and some muslin for making patterns and test covers. I didn’t intend to sew the final covers, as it would punch holes in the vinyl. But something else happened then that I did not intend: the E-6000 not only wouldn’t hold up to much pulling (even when I roughed up the shiny vinyl lightly with sandpaper), but flat-out refused to bond to the back side of the vinyl. It didn’t matter that the suggested temperature range meant I’d waited until nearly sunset to be able to use it at all. It just beaded up, dried, and fell off. So, since I didn’t want to mess with mass quantities of hot glue that I’d need to shepherd along definite “seam” lines, it was going to have to be sewing.
We started with pattern creation, which I very nearly botched because we still hadn’t decided whether to attach the covers permanently (with something other than the E-6000, obviously). Sarcasm-hime’s tutorial and the tutorial by God Save the Queen Fashions were absolutely invaluable in helping me get these things made. (Sewing a stuffed rabbit from homemade patterns does NOT provide adequate preparation for making clothing using similar methods.) I managed to get the inner and outer halves of the pattern almost exactly the same size, and the seams came out both straight and centered on the shoe. And one of the cool things about vinyl is that you can write on the back of it with a plain Bic mechanical pencil. (You can’t erase, though. The insides of the covers still say “I” and “O” for “inside” and”outside.”) So I didn’t have to pin anything, just cut the patterns along the seam lines, trace, and then cut about 1/2″ bigger than the pencil lines. 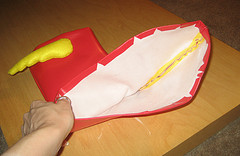 The problem was that, on one set of vinyl cutouts, I neglected to mark the location of the bottom of the shoe. It wasn’t at the bottom of the pattern piece, as I’d left a big allowance to either turn under for a more finished and durable bottom edge or sew to a partial sole of more tractiony material. Plus, I’d decided to extend the tops higher than we’d want them to be in the finished product, so that we could size that part by sight and turn the excess inside; and thus I hadn’t made a hard-and-fast measurement of the ideal height, either. What with the vinyl being a wavy-edged remnant and my seam allowance being eyeballed, I had only the slight “notch” at the Achilles, above the shoe heel, with which to align the pieces. It was the second set, a clear case of getting cocky. I ended up having to pin the vinyl after all, and then actually baste it. So remember, kids: mark where the bottom of your shoe is, even if you don’t know where the covers are actually going to stop.
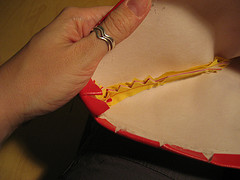
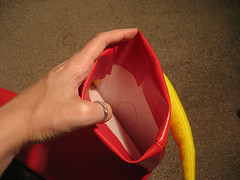 There is, I discovered, a catch to sewing vinyl: you have to sandwich all your vinyl between two layers of woven cloth. If you don’t, the stitches will pull right through the vinyl. Luckily, I tested this before doing any sewing. Also luckily, I had some cloth lying around from another project (it was even yellow!) and was able to get appropriately-shaped strips out of it for securing the seams. The sewing was actually done by Kelson, who’s better with a plain sewing machine than I am (I prefer overlocks, but we didn’t have access to one). I pulled out all the basting thread I could, trimmed the seam allowances, clipped the curves, and popped the covers onto the shoes. It was a huge moment of triumph when they actually fit.
From experiments with scraps, I had learned that Fabri-Tac glue held reasonably well when bonding the back of the vinyl to the strip of rubber encircling the sole of the shoe. I situated the covers correctly and attached them with a line of glue around the top of each rubber strip. This made it easier to trim the bottom edges to an appropriate length for turning under. It didn’t, however make it easier to get the edges to lie down in the curves I wanted. I also learned that the edge needed to be a little higher than the bottom edge of the strip, to account for the sole being compressed while walking. I must have re-clipped and reglued every curve in those boots three times before I was satisfied. Then we decided on a height for the boots, which I marked with some of the gold paint–acrylic washes off plastic–so I’d know where to attach the wings.
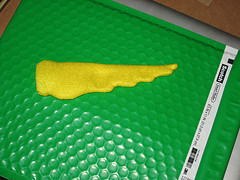 The wings for the boots were hand-sewn from felt. I traced the helmet wing pattern onto one piece of felt, cut it out with a seam allowance, pinned it to the second piece, and sewed a backstitch along the lines. The curves were clipped very finely, as I eventually had to turn the whole thing inside out. The inside-out process was kind of nerve-wracking, due to the small size of the pieces; I actually found a small crochet hook useful to pull the narrow end out of the mass of scrunch, and the blunt end of a larger hook perfect for popping out the last feather-tip. The hooks were good for stuffing the wings, too, once I was able to roll a small enough pellet of fiberfill to go into each segment. I closed the wide end with Fabri-Tac, in several little tabbed sections so as to keep it rounded, rather than try to sew it.
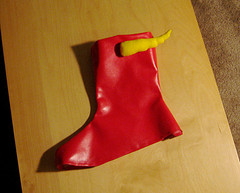 To attach the wings, I Fabri-Tac’d a square of the yellow cloth to the inside of each boot at the right spot and sewed through it into the felt. I found that using a two-needle technique allowed me to pull the thread tight without fear of a knot unraveling or pulling through the vinyl, and also let me tie the ends in a good solid knot. Useful when sewing on bits that are likely to get pulled around a lot at odd angles. With the wings attached, I trimmed the seam allowances inside the boot tops, cut the excess off even, and cut a thin wedge out of each side (not technically a dart, but serves the same purpose), and glued the flaps down. A little cleaning with a wet paper towel, and they were done.
The Shirt
As I mentioned in the previous post, we had thought that Graphitti Designs had an appropriate lightning-bolt shirt for sale. Kelson was able to order one, but the next day got an email informing him that the design was discontinued and his size was out of stock. Well, crap. With just over a week to go, our options were limited. He looked around in a few stores, but quickly realized that looking for a long-sleeved shirt in JULY wasn’t likely to get anywhere. So he ordered an appropriate shirt that offered fast shipping, and we procured some yellow fabric paint.
 I know what you’re thinking, and you’re right. Yellow on red is not a good idea if you want to get something other than dark orange. But the label said it was made for opacity (Jacquard Neopaque, if you’re curious), and I decided to trust it. We washed the shirt, Kelson laid out the design in masking tape, and I set up an improvised shirt board and brushed on the first coat. It…wasn’t opaque. Partway through, I found that the “shake well” instruction should have been “stir well,” and I went over the painted area again with the slightly thicker result. It helped, but not nearly enough. In the end, I had to use three thick coats, and in order to let it dry for 24 hours before heat-setting, I was ironing it at 11:30 on Tuesday night.
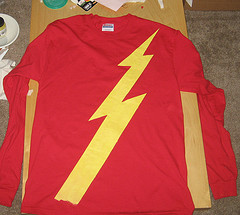 Handy tip: red fabric gets darker when ironed. It’s not necessarily burning just because it looks like it. I freaked out royally, thinking I’d scorched the most visible piece of the costume by following the “high heat for 30 seconds” directions on the paint jar. Hey, they didn’t get the mixing instructions down too well. Fortunately, the darkening of color subsides pretty fast as the fabric cools, so I figured it out before doing anything drastic. I was very glad for my sleeve board, which was just about exactly the right width for ironing only the design.
And that, as they say, is it. I welcome questions from curious souls, advice from other costumers, and of course general comments. It may not sound like it above, but I had a blast making this costume. And I’m thinking of things to do in the future, too…
This is brilliant. My next fancy dress costume will be as Jay Garrick so thanks for posting this.
.-= saranga’s latest blog post: Nick Griffin thinks London has undergone an ethnic cleansing. Has it bollocks. =-.